Monday, December 20, 2010

Beautiful Paper Flowers

Paper Flower

 
Step 1:  Cut a square piece of cardstock at least 2 -3 inches. .  I drew a sprial shape so you could see how you should cut it.  I would not recommend drawing the line if you feel comfortable enough to cut a spiral freehand.
Step 2: Cut the spiral shape out of the cardstock square.  Be sure to leave a small circle in the center to use as the base for the flower to sit on. 
Step 3: Trim off the square corner and distress (rough up) the outside edges of  spiral.                                                           
Step 4: Use CTMH ink to edge the outer edge of the spiral circle using a sponge to apply the ink to the paper.  This will give your paper flower some more texture and dimensional with the additional of a soft colour.                                           
Step 5: Now it is time to start rolling your paper flower.  It is easiest to start with a pair of tweezers to wrap the outside piece as tight as possible.  If you look at step 4 you can see that I started doing this.  Keep rolling the spiral as tight (smaller flower) or as loose (larger flower) as you like.  Every few twirls around you should use a mini glue dot to adhere it in place.  Once you get to the final twirl around and end up at the circle for the base, place one of two glue dots down and press the paper flower down onto the base.  This should hold it long enough for you to apply Liquid Glass .  For a final touch add an embellishment like an opaque pearl ahesive gem or a sparkle gem.  And then voila...you have a beautiful paper flower to decorate a card, craft or book!

Thursday, December 16, 2010

Interactive Layouts with Holdiay Magic!!!


Interactive Layouts

This is a very fun idea to add extra photos with a flair of surprise!  Hope you enjoy this layout.  Check out the video link: Holiday Magic.  Try this using Mistletoe Paper.
"Holiday Magic" Collection
Collection is no longer available. 

Mistletoe Paper could be substituted.
Additional Items
D1171 My Acrylix® Fallen Snow
X7103B Aspen Level 2 Paper Packet
4113 Six Pocket Photo Storage Pages
Z1104 Clear Sparkles
X5750 Color-Ready Alphabets Bold

Z2140 Outdoor Denim Exclusive Inks™ Pad
Z2340 Outdoor Denim Exclusive Inks™ Marker
Z697 Sponge


Helpful Hints
To re-create the page shown here, follow these helpful hints. For more detailed information on how to assemble the featured page, contact your Close To My Heart Consultant.
  • Cut one sheet of cardstock into three 4" x 12" pieces.
  • Using your paper trimmer as a guide, score each 4" x 12" piece in the middle, at the 6" mark.
  • Using Outdoor Denim ink and the sponging technique, apply ink to the edges of the pieces, on the front and back.
  • Using Outdoor Denim ink and the second generation stamping technique, add stamped images to the cardstock.
  • Using Outdoor Denim ink, stamp accent images on the cardstock.
  • Add Sparkles as desired.
  • While the Color-Ready Alphabets letters are still on the carrier sheet, use the Outdoor Denim marker to color letters for your title.
  • Apply the colored letters to the cardstock as desired.
  • Add desired photos and add complementary stamped images to the photos, if desired.
  • Insert the cardstock strips into the photo storage page.
  • To create the pocket for the interactive flap, cut the photo storage page as follows:
    • Trim away the edge with the binder holes, making sure to leave the seam intact. (You will be left with the six pockets.)
    • Position the page so there are three pockets on each side.
    • Cut the page in half vertically, leaving two halves with three pockets on each half.
    • Cut off the two end pockets on each half, making sure to leave the seam intact. (This will make the middle section unusable for this project.)
    • Slide an intact pocket over the interactive flap.

Wednesday, December 15, 2010

How to make a Paper Pinwheel!

Pinwheel Pattern
1. Start with 2 pieces of B&T paper, each cut 2 1/2" square.
2. Glue pieces of B&T paper together, wrong sides together.
3. With pencil, light draw a line from corner to corner. X shape
4. Measure in 1" from each corner to form an X shape onto the square. Cut along the solid lines 1" in from the corners.  Do not cut into the center of the X.
5. Alternating corners, fold 4 points into center. Glue in place.
6. Use a brad or eyelet in the center of pinwheel to hold in place.

Thursday, December 9, 2010

Art & Soul®: Stencil, Sparkle, and Shine


Art & Soul®: Stencil, Sparkle, and Shine


Featured Technique
Stamp Stenciling
Materials Needed
9033 Wishes Card Confidence Program™
B1361 My Acrylix® Tannenbaum Stamp Set
X7130B Mistletoe Level 2 Paper Packet
Z2135 New England Ivy Exclusive Inks® Pad
Z1209 Designer Ribbon Cranberry Collection
Z1326 Sparkles Red, Pink, & Purple Assortment
Z1114 Piercing Tool Kit
Z697 Sponge


To create the project shown here, follow the helpful hints and the Midpoint™ pattern as outlined in our how-to book Wishes™. For more detailed information on how to create the featured technique and project, or to purchase a copy of Wishes, contact your Close To My Heart Consultant.   https://scrapwithheather.myctmh.com/Retail/RetailLanding.aspx?PageId=184   or email heatherkaufmann@hotmail.com
  • Trim papers according to dimensions listed on page 77 of Wishes. Cut one 3” x 1 1/2” Colonial White cardstock and one 3/4” x 2” Colonial White cardstock for stamped accents.  
  • Stamp inner tree with New England Ivy ink on 3” x 1 1/2” Colonial White cardstock and sentiment on 3/4” x 2” Colonial White cardstock. Trim tree and make tag from sentiment.
  • Stamp lined tree with New England Ivy ink on A.
  • Apply New England Ivy ink to edges of all papers, excluding card base. 
  • Attach cut-out inner tree to center of lined tree.
  • Pierce deep holes along outline of lined tree, making the holes about 1/8” from one another.
  • Assemble layout according to instructions on page 77, attaching ribbon and sentiment before adhering A.
  • Tie ribbon knot and fray ends.
  • Attach ribbon knot and Sparkles, as desired.

Wednesday, December 8, 2010

Tic Tac Toe Snow Men


These are great little stocking stuffers or a sweet treat for a friend.


Here is what you will need to make these cuties!
Coloured Cardstock: 4 1/2" x 3" (main piece)
Patterned Paper: 4 1/2" x 3"  (outside paper)
Patterned Paper: 1 1/4" x 3 1/4" (inside paper)
White Cardstock:  1 3/4" x 2 3/4" (image front)
Paper Punch: 3/4" to 1"
Ribbon: 6 inches


Glue ribbon between main piece of coloured cardstock and outside patterned paper.  Score at 2" and at 2 1/2".  Stamp image of "Share the Magic" snowman stamp onto the white cardstock.  Use a paper rounder to round the corners for a softer look.  Use CTMH Exclusive Inks and the Waterbrush (1771) to colour in the stamped image.  Punch a hole in the belly of the snowman.  Glue the white cardstock with the finished image onto the outside of the little booklet.  Attach the inside patterned paper to the isnide of the booklet and also to the Tic Tacs with Tomboy Mom Adhesive (1514) and a piece of 3-D Foam Tape ( Z1151). 

Click to order supplies to make this craft

Thursday, November 25, 2010

December Campaign - Plenty for $20 !!!

Please click here to go to my MyCTMH website to get your FREE STAMP SET!!:
When you shop my MyCTMH website and spend $20 or more on wonderful Close To My Heart products, you'll receive a free D-size stamp set valued at $26.95—that more than doubles your value!
(Offer valid from December 1st until December 31st) 

Novemer Campaign - A Little MORE Thanks!

Click here to go to my MyCTMH website!

Thursday, October 21, 2010

Two Batik Cards

Batik technique on cardstock

To create the look of batik on cardstock, stamp an image with clear ink (VersaMark watermark ink pad is the one that I used) and then cover with clear embossing powder.  Use a heat tool to emboss the stamped image.  Next, have 3 to 4 different ink colours in the same colour family with different tones.  Start with the lightest colour and apply ink with a sponge in various places around the cardstock.  Do not be afraid to go over your stamped image because the clear embossing powder will resist the coloured ink that you are applying to the cardstock.  Then do the same with the next few colours, overlapping them and going from lightest to darkest.  This will give you a batik look to your cardstock.

Bleached Ink Daisy Card for fall


To make this card.  First start with a brayer tool or use a sponge to ink onto white cardstock.  Next, use a heat tool to dry the inked cardstock.  Once the ink is dry you can stamp an  image of your choice, I used a daisy stamp. Then cover the stamped image with black embossing powder.  Brush off any stray embossing powder (be careful not to remove the powder from your image). Use a heat tool to emboss the image.  Next, fill a small glass container with bleach and use a small brush to brush out the stamped image.  The bleach will remove the ink while leaving the black stamped image remaining.  Then you can decorate your card with a sentiment and anything else you like.  I popped my framed image up with double sided foam tape to give it more dimension. 
** the bleach will only stay fresh for a few hours so do not save the used bleach for stamping again after that. 

Wednesday, October 6, 2010

Close to My Heart's Stamp of the Month for October ~SHARE THE MAGIC~

October Stamp of the Month "Share the Magic"
Find out how you can get this adorable seasonal stamp set for free!
    Visit my website http://scrapwithheather.myctmh.com/

Friday, September 17, 2010

Hallowwen Pages for Dawn's Party using Hooligan Paper

Double Layout of my son with his spider shirt on....all ready for Halloween!
This is a double layout using CTMH Hooligans paper and My Acrylix Creepy Cobweb Stamps.  I love all the new colours of ink: sunset, pear, gypsy and lagoon. I also used black embossing powder to make the spider webs more three dimensional.

 
Scrapbook page with front of little photo booklet showing
2nd page of little photo booklet
I made a little booklet of photos on this page.  When you put it into your scrapbook album carefully make a slit at the opening location of the booklet on the plastic sleeve that it will fit into and then slide it though.  It sometimes takes a bit of manuveuring but it will go in.  It is quite easy.  I was trying to think of more ways to put as many photos on a page because the home gathering is at Dawn's house and she loves to put on lots of photos. It was a good challenge for me as I usually only use one photo or one 5"x7" and lots of 2"x 2.5" photos on a page. 

3rd page of little photo booklet
Layout for Vertical Photos
This is another option if you have vertical photos.  They did not work on the other page as well so I used My Acrylix Fight Night stamp set (B1359) with the Creepy Cobwebs stamp set (D1319).  I really like the Hooligan paper.  It is terrific for Halloween but looks amazing for regular themed pages as well.  The colours are really bright.  The orange B&T paper is the backside of a great pear green desing with litttle hooligans on a maze like grid. 

Thursday, September 16, 2010

Clear Cards- Halloween

Here is a Halloween card desinged using Close To My Heart Clear Cards, CTMH Sunset Cardstock, the new paper from CTMH's Olivia Level 2 Paper Packet and My Acryliz Stamp Sets.  The Clear Cards were embossed with a Cuttlebug.  The Cuttlebug Embossing Folders work perfectly with Close To My Heart's Clear Cards.

Wednesday, September 15, 2010

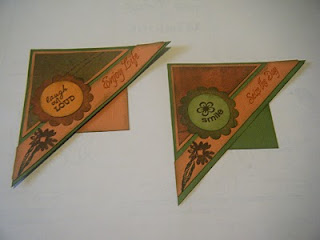
Corner Book Marks....great for a small teacher gift

  I made these two corner book marks for Liam's teacher as a beginning of the year little thank you, or should I say "un petit Merci beaucoup" now that he is in french immersion.  They are very easy to make and can be made in such a variety of colours and patterns.  It is a very easy pattern to follow.  Cut out a square (3") a small triangle (divide a 3" square in half) and a larger triangle (divide a 4" square in half).  You can decorate it however you like.  I just kept it simple and punched out flowers and used the same autumn colours (CTMH Olive and Sunset) and stamped some nice sentiments on the front and a design on the back.


Cut two 3" square and one 4"square.


Cut one of the 3" squares and the 4" square in half.


Ink your edges and decorative shapes. 


Attach your pieces together with your favourite adhesive.  I used a CTMH glue to make sure they stick together because they will hopefully be well used.  Stamp on any sentiments you would like and add any extra sparkly embellishments and you are done. It is that easy!!!

Tuesday, September 14, 2010

50 Christmas Cards for $30 Cardmaking Workshop


Make 50 Christmas Cards for $30 at my early Christmas Card Making Workshop!


I will supply everything for all 50 cards except the adhesive! 
The Workshop will include: 50 Cards and ENVELOPES
CTMH Mistletoe Paper (pre cut to size) 
CTMH Mistletoe Cardstock
Use of my Inks, Stamp Sets and Punches
IF YOU ARE INTERESTED PLEASE CONTACT ME AT heatherkaufmann@hotmail.com


Wednesday, September 8, 2010

Winter Clear Card and Glimmer Mist Recipe


I made this card using CTMH Clear Cards, Magnifique paper, Pacifica and Lagoon Exclusive Inks. It was a lot of fun to make. I am excited to try EMBOSSING the clear cards!! I also made a silver Glimmer Mist and added it on the Lagoon Cardstock on the inside of the card.
Here is the recipe for anyone interested in making their own glimmer mist. It is easy!
Glimmer Mist Recipe
-couple of drops of CTMH Re-Inker
-pea size drop of CTMH Pearl Create a Shade
-1/2 Tbsp of rubbing alcohol

Use a small mini mister bottle to use as a spray
your glimmer mist. Enjoy!
Happy Crafting,
Heather

Friday, September 3, 2010

Cup of tea card.....You Warm My Heart!

What I used to make this card:

My Acrylix Stamp Set - A Sip (A1109)

Wokshops on the go ~Magnigique -My Acrylix Heart to Heart Stamp Set

Magnifique Level 2 Paper Packet (X7127B)

Sunflower Cardstock (!242)

Chocolate Cardstock (X5643)

Exclusive Inks Stamp Pads -Sunflower (Z2150), Lagoon (Z2195), Outdoor Denim (Z2140) and Black (Z2105)

Embossing Powders (Z669)

My 1st blog posting

Well, it is the Friday before school starts and I decided that I should start a blog.
Hopefully, I will be better at blogging than tweeting. :)
I am happy that I am now a Close To My Heart Independent Consultant. It is wonderful to fuel a creative addiction with the knowledge that I now must scrapbook, make cards and create interesting crafts, offer home gatherings, classes, workshops and clubs for my job!! Life is truly fabulous! I will be posting lots of photos in the near future. Until then....happy crafting!